
Every time I attend an author event, there is always the attempt to separate authors into the two camps of those who meticulously outline and those that write completely by the seat-of-the-pants, affectionately known as ‘pantsers’.
I sat and listened to the virtues of these two camps and decided that I am firmly planted in a third camp. I don’t outline every chapter, but I do like a road map. I consider my method more visual and less rigid than outlining, but, to continue the road map analogy, I don’t like to just get in the car and go in whatever direction the road takes me.
I do let my characters and their personalities drive within the conscripts of my loose road map, but I don’t confine them to one road. If they want to take the scenic route, I’m open to that.
So, how does this process work, I’ll try to lay it out for you the best that I can. I’m gearing this toward the writing of fiction. Non-fiction, in my opinion, works a bit differently.
Step 1 – Come Up With an Idea
Sounds easy, right. It’s not really. A good story has to have a great beginning. In this world of instant gratification and short attention spans, you’ve got to grab your reader from the beginning. I think we’d all agree that you need a good ending. Nothing is more of a letdown than investing your time in a book only to have an ending that disappoints. (Have you read The Firm).
The thing that writers struggle with the most is the middle (often called ‘the muddle’). If your book meanders off into dark corners and doesn’t recover well, you’ll lose your readers.
Make sure your idea is strong and has a strong second act.
Step 2 – The Mind Map
The mind map is a technique I’ve used in my consulting career to storyboard presentations, but it translates well to writing. It is a visual representation of your book that starts with the book title in a cloud in the middle of the picture and connected rectangles surrounding it. Each rectangle represents an idea which could be a chapter. I use one or two sentences in each rectangle to represent the main idea of the chapter. Here is a mind map that I used for my second book, Let Me Be Frank.
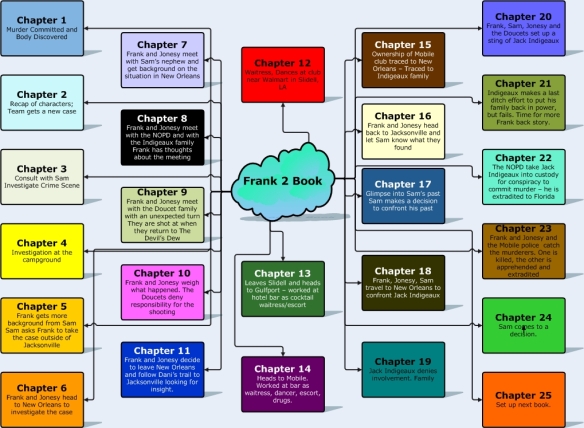
When I created this mind map, I left the chapter numbers off so that I would have the latitude to re-order them if needed. This mind map allows me to move into the next phase of building the novel seamlessly.
Step 3 – Set Up Your Tool of Choice
My tool of choice for writing is Scrivener. It’s an industry-standard tool and has some built in utilities that are very useful. The thing I like about it is that it emulates the old corkboard and index card method of writing about as closely as an electronic word processing tool can.
When I open up a new project in Scivener, I go right to the corkboard view and lay out my chapters just as they are in my mind map. Here is what it looks like from the same book.
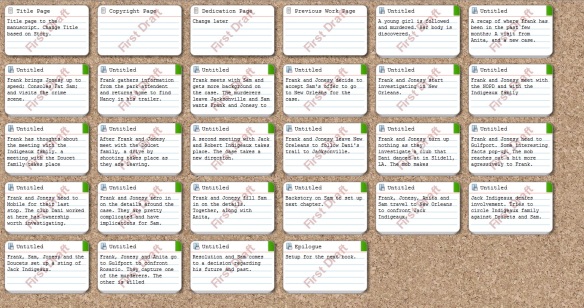
You’ll notice that none of my chapters have numbers. Scrivener will automatically number them based on the order that I put them in on the cork board. In this view, you can drag and drop to your hear’s content.
I usually set up my entire book before I write. Then I can drill down into the next step.
Step 4 – Set Up Scenes Within Uour Chapters
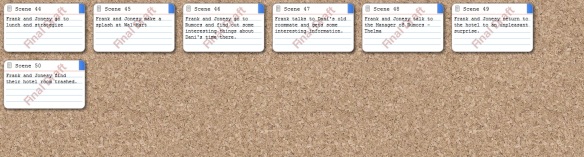
Just like the chapter view, Scrivener gives me a scene view. As I write each chapter, I set up scenes within it. The scenes usually correspond with a change in the setting. They can be long or short. A chapter can contain a single scene or many. In my view, each chapter is a self contained story, or episode, within the book. A corkboard view for a single chapter is shown below.
I don’t want this post to be a commercial for Scrivener, but it’s the tool I use and if you’re wanting something that organizes your writing better than just a straight word processor, it’s worth checking out. Like the full book view, you can rearrange the cards on the corkboard to change the order of scenes.
Step 5 – Other Visualization Methods
As I complete each chapter in the book, I like to use other tools to see if I’m on track. One tool that I have talked about in the past that is a popular social media trending tool is generating a word cloud. Word clouds count how many times a word is used in a certain context and generates a graphic with the most used words in a larger size, more prominent color, or both. I did this with one of my detective books and was pleased with the result shown below:

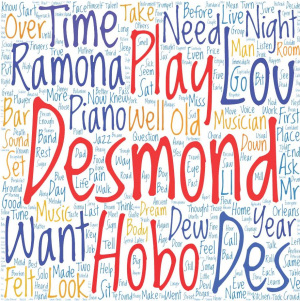
In another example, I wrote a short story about a boy named Desmond that sells his soul to an evil character named Lou to become a great jazz pianist. The result is below:
There are several free Internet tools that will do this.
As for the steps that are left, they include things like:
- Finish writing your book
- Enlist the help of an editor
- Fix the things the editor finds
- Design a cover
- Market it
- Sell it
- Spend your riches
Of course, I will expand on many of these in future posts. Also, I have a book with many of these tips spelled out in more detail that is available on Amazon that you can get by clicking the cover below.
![Pageflex Persona [document: PRS0000038_00054]](https://donmassenzio.wordpress.com/wp-content/uploads/2016/03/front-cover.jpg?w=198&h=300)
I look forward to hearing from fellow authors on the steps you use. Please comment as you see fit.

Good techniques.
You’re a cross-pantser much like myself (not to be confused with cross dressing of course).
LikeLiked by 1 person
That I am.
LikeLiked by 1 person
Thanks Don for this great post. I’m thinking about Scrivner. Seems it might work well for me.
-N
LikeLiked by 1 person
Scrivener is a great tool. I am pleased with it.
LikeLike
I love your mind map. Did you use a particular mind mapping tool? I use scrivener but have not thought of outlining the way you demonstrate. Excellent post and thanks for sharing. @sheilagood at Cow Pasture Chronicles
LikeLiked by 1 person
Thanks. I use Microsoft PowerPoint, but you can use word or any software that allows you to do shapes. You can also use a corkboard with index cards if you want to go low tech or even a white board.
LikeLiked by 1 person
Thanks for the quick reply! I have power point, so maybe I’ll try that first.
LikeLiked by 1 person
If you need help, let me know. Good luck.
LikeLiked by 1 person
My method is similat to yours. I need to have my beginning and end firmly in my head before I begin to write. By having my A and Z (and the Z included the change in my protagonist) I find it easy to write. I don’t outline anything on paper until I begin the edit process. On a side note, I create my poems in a similar way. Odd, but it works for me. I enjoyed reading this. Always love reading the writing process for authors.
LikeLiked by 1 person
Thanks for sharing your process. I’m constantly tweaking mine so that I can get to the writing (the fun part) faster.
LikeLiked by 1 person
Do you have any posts on managing time between our manuscripts and our blogs. I definitely need advice on that.
LikeLiked by 1 person
I wrote this one on fitting in writing with your day job: https://donmassenzio.wordpress.com/2014/10/11/top-ten-tips-for-writers-that-have-day-jobs/
I can see one coming on fitting in blogging, however, since I’m facing that now as well. I didn’t put as much energy into my blog until the beginning of February and it has exploded, but so has the time commitment. I think you’ve given me an idea for a subject…if I can find the time to write it.
LikeLiked by 1 person
It would make for a great post. My blogging started this past September. I had no idea this thing was going to explode the way it has. I try to follow everyone who follows me (but 1200+) has turned into hours of reading. I’d like to hear your thoughts on the time management aspect of this. A few weeks ago, I started posting less. but I discovered the root of the time issues aren’t my posts or responding to comments. It is the reading of my loyal followers. Looking forward to hear your ideas. Thanks so much.
LikeLiked by 1 person
Yes. It’s responding, reblogging, and reading the posts of others. One thing I did was to make sure that I only get a digest of posts daily instead of instantly. Then I can spend a block of time in the morning looking through them. I think this will be a post in the next week or so. Thanks for the idea.
LikeLiked by 1 person
Understood. I have categorized my followers by their following of me. I have instant and daily notifications. That has helped a bit. Anxious to read your post on this. Be well.
LikeLiked by 1 person
That’s a good way to do it.
LikeLiked by 1 person